


♫Archos Video Player v8.0.1♫

Movie ေတြၾကည္လင္ျပတ္သားစြာၾကည္႔ရႈႏိုင္တဲ့ Archos Video Player ဗားရွင္းအသစ္ေလးထြက္လာ လို႔ Movie ေတြကိုရုပ္ထြက္ေကာင္းေကာင္း နဲ႔ၾကည့္ျခင္တဲ့ေဘာ္ဒါေတြအတြက္တင္ေပးလိုက္ပါတယ္၊၊video formatေတာ္ေတာ္မ်ားမ်ားကုိဖြင့္ႏုိင္မွာၿဖစ္ပါတယ္။ -OnlineေပၚမွTVလုိင္းမ်ားအၿပင္ အင္တာနက္မွဇာတ္ကားမ်ားကိုလည္းၾကည့္ရူႏုိင္မွာၿဖစ္္ပါတယ္။ ထုိ့အၿပင္တၿခားFeaturesမ်ားစြာပါ၀င္ပါတယ္။Android4.0.3 ႏွင့္အထက္ကစျပီးအသံုးျပဳႏိုင္ပါတယ္။ဒါေပမဲ့ Play Store မွာထိုင္းဘတ္149.00နဲ႕ေရာင္းပါတယ္။ဒီမွာေတာ့အခမဲ့ေဒါင္းယူသြားႏိုင္ပါတယ္ဗ်ာ။
Android2.1 ႏွင့္အထက္ကစျပီးအသံုးျပဳႏိုင္ပါတယ္။ဒါေပမဲ့ Play Store မွာထိုင္းဘတ္64.28နဲ႕ေရာင္းပါတယ္။ဒီမွာေတာ့အခမဲ့ေဒါင္းယူသြားႏိုင္ပါတယ္ဗ်ာ။
Your Online Store Builder : http://bit.ly/123sell
Your Online Store Builder : http://bit.ly/123sell
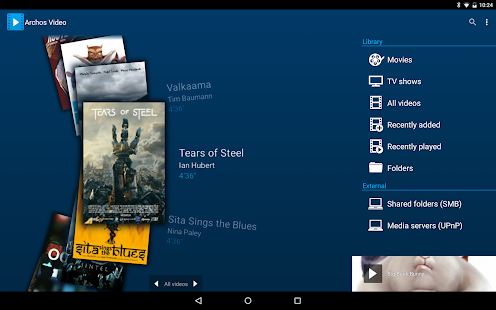
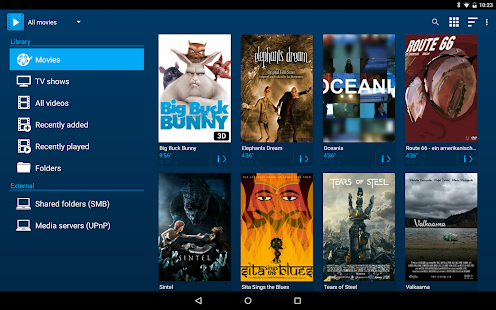
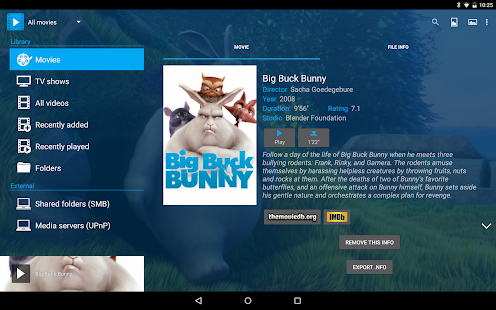
ARCHOS makes Video Player app available for all Android tablets and phones (requires Android 4.0 or later)!
The critically acclaimed Archos video player app offers an uncompromised multimedia experience.
- Hardware accelerated video decoding support for most devices and video formats;
- Ability to play content from any computer/network storage in your local network (SMB and UPnP) or from an external USB storage device;
- Automatic online retrieval of Movie and TV show information with poster and backdrop for both local and network content;
- Integrated subtitle downloader;
- Network indexing: import remote shared folders (SMB) in your multimedia library;
- Video browsing with either folder or library based navigation;
- Ubiquitous access to TV shows sorted in a series/season/episode hierarchical view;
- Multi-device network video resume;
- TV friendly: dedicated user interface that is keyboard/remote control compatible, AndroidTV compatibility ;
- Share and keep track of what you have watched using Trakt scrobbler (see http://trakt.tv/);
- 3D video: visual tagging and side by side/top bottom playback mode with Archos stereo virtual reality glasses or cardboard support;
- Audio: night mode and audio boost options;
- Android 5.0 Lollipop support with flat/material user interface design.
* Note that if you experience any issue with video hardware decoding you can force software decoding in Archos Video Player application settings to watch your video.
https://play.google.com/store/apps/details?id=com.archos.mediacenter.video

ဖုန္းမွာ root ရွိမရွိ စစ္ေဆးေပးမဲ့ Root Checker Pro v3.64Apk

ဒါေလးကေတာ့ မိမိ Android ဖုန္းမွာ Root ေဖာက္ၿပီးေတာ့ Root အမွန္တကယ္ ရ မ ရ ကိုျပန္စစ္ေပးမယ့္ application ေကာင္းေလးတခု႔ပါ။ ဒါေလးက လိုအပ္ပါတယ္။က်ေနာ္တိုရဲ႕ ဖုန္းကို Root tool တခုခု နဲ႔ root ၿပီးတဲ့အခါမွာ Super User ေပၚလာတာရွိသလို မေပၚလာတာလည္းရွိတယ္။တခါတေလၾကေတာ့ SuperUser ေပၚေနၿပီးေတာ့ Root Access မရတာေတြျဖစ္တက္ပါတယ္။ဒါေလးကေတာ့ Root ေအာင္ျမင္ျခင္း ရွိမရွိ ကိုစစ္ေဆးေပးႏိူင္ပါတယ္ အေသးစိတ္ကို ဒီမွာၾကည့္လိုက္ပါ၊ Android2.3 ႏွင့္အထက္ကစျပီးအသံုးျပဳႏိုင္ပါတယ္။ဒါေပမဲ့ Play Store မွာထိုင္းဘတ္65.36နဲ႕ေရာင္းပါတယ္။ဒီမွာေတာ့အခမဲ့ေဒါင္းယူသြားႏိုင္ပါတယ္ဗ်ာ။
Android2.1 ႏွင့္အထက္ကစျပီးအသံုးျပဳႏိုင္ပါတယ္။ဒါေပမဲ့ Play Store မွာထိုင္းဘတ္64.28နဲ႕ေရာင္းပါတယ္။ဒီမွာေတာ့အခမဲ့ေဒါင္းယူသြားႏိုင္ပါတယ္ဗ်ာ။
Your Online Store Builder : http://bit.ly/123sell
Your Online Store Builder : http://bit.ly/123sell
Android2.1 ႏွင့္အထက္ကစျပီးအသံုးျပဳႏိုင္ပါတယ္။ဒါေပမဲ့ Play Store မွာထိုင္းဘတ္64.28နဲ႕ေရာင္းပါတယ္။ဒီမွာေတာ့အခမဲ့ေဒါင္းယူသြားႏိုင္ပါတယ္ဗ်ာ။
Your Online Store Builder : http://bit.ly/123sell
Your Online Store Builder : http://bit.ly/123sell
Android 4.0.3မွာအသံုးျပဳႏိုင္ပါတယ္။ ဒါေပမဲ့ Play Store မွာထိုင္းဘတ္224.68နဲ႕ေရာင္းပါတယ္။ဒီမွာေတာ့အခမဲ့ေဒါင္းယူသြားႏိုင္ပါတယ္ဗ်ာ။
Your Online Store Builder : http://bit.ly/123sell
Your Online Store Builder : http://bit.ly/123sell
Android 4.0.3မွာအသံုးျပဳႏိုင္ပါတယ္။ ဒါေပမဲ့ Play Store မွာထိုင္းဘတ္224.68နဲ႕ေရာင္းပါတယ္။ဒီမွာေတာ့အခမဲ့ေဒါင္းယူသြားႏိုင္ပါတယ္ဗ်ာ။
Your Online Store Builder : http://bit.ly/123sell
Your Online Store Builder : http://bit.ly/123sell
Android 4.0.3မွာအသံုးျပဳႏိုင္ပါတယ္။ ဒါေပမဲ့ Play Store မွာထိုင္းဘတ္224.68နဲ႕ေရာင္းပါတယ္။ဒီမွာေတာ့အခမဲ့ေဒါင္းယူသြားႏိုင္ပါတယ္ဗ်ာ။
Your Online Store Builder : http://bit.ly/123sell
Your Online Store Builder : http://bit.ly/123sell
Android 4.0.3မွာအသံုးျပဳႏိုင္ပါတယ္။ ဒါေပမဲ့ Play Store မွာထိုင္းဘတ္224.68နဲ႕ေရာင္းပါတယ္။ဒီမွာေတာ့အခမဲ့ေဒါင္းယူသြားႏိုင္ပါတယ္ဗ်ာ။
Your Online Store Builder : http://bit.ly/123sell
Your Online Store Builder : http://bit.ly/123sell
Android 4.0.3မွာအသံုးျပဳႏိုင္ပါတယ္။ ဒါေပမဲ့ Play Store မွာထိုင္းဘတ္224.68နဲ႕ေရာင္းပါတယ္။ဒီမွာေတာ့အခမဲ့ေဒါင္းယူသြားႏိုင္ပါတယ္ဗ်ာ။
Your Online Store Builder : http://bit.ly/123sell
This application, Root Checker, will allow the user to confirm they have proper root ( superuser ) access configured and operational.Your Online Store Builder : http://bit.ly/123sell
**** DISCLAIMER: THIS APPLICATION WILL NOT ROOT THE DEVICE ****
*Feel free to email me with any questions. I always reply!*
The goal of this application is to provide even the newest Android user with a simple method to check their device for root (administrator/superuser) access.
This is a very simple application to notify the user whether or not they have properly setup root access.
This application will test the device for root access using a very simple, quick and reliable method. The su binary is the most common binary used on Android devices to grant and manage root access. Root Checker will check and verify that the su binary is located in a standard location on the device. Root Checker will also confirm the proper permissions and flags on the su binary in addition to testing that access is granted by the su binary.
Many times users experience issues along the path of installing, configuring and gaining root access. For some users the process can seem complex while for others the process can seem simple. Regardless of the user's technical skill set, Root Checker, will quickly and correctly verify whether or not root access is 100% functioning. The process of confirming root access is sometimes known by other terms such as, gaining superuser access or gaining administrator access. Root Checker covers all these terms as they relate to one core function, being able to execute commands with root access.
If the Superuser or SuperSU applications are installed and working properly, these applications will prompt the user to accept or deny the root access request from Root Checker. Accepting the request will allow Root Checker to check for root access. Denying the request will result in Root Checker reporting no root access.
Gaining root access varies based on manufacturer, model, and carrier. If you're searching for root access to your device, this application will not help you. If you're interested in rooting your device, please use http://www.google.com to find the appropriate rooting support areas for your specific device. Other popular web sites which provide rooting guides are http://forum.xda-developers.com and http://forum.sdx-developers.com.
Please don't leave negative feedback about a concern, bug or issue! Instead, please email me,with your feedback, suggestions and comments!
I do my best to assist as many people as possible and appreciate all the support that has made this application successful! Thank you!
Features:
- Detects if your phone has Root access
- Device and Android Version along with the API Level
- Displays SuperUser Version
- Displays BusyBox and Su Versions
- User and Group Id
- SuperUser Location
- Su and Sudo Location
- Environment Variables
- Displays Phone's Build Information
Permissions requested:
- Internet - Google Analytics/Send Feedback
- SuperUser - Check for Root access
Root Checker by Jared Burrows
Visit: http://www.burrowsapps.com/
Find me on Google+: https://plus.google.com/+JaredBurrows
Send all suggestions to burrowsapps@gmail.com
https://play.google.com/store/apps/details?id=burrows.apps.rootchecker.paid
ဂူဂဲလ္ဘာသာျပန္မွာ ျမန္မာစာလည္း ရၿပီ

ဂူဂဲလ္ဟာ ဘာသာစကားေပါင္း ၉၀ ခုကို ဘာသာျပန္တဲ့ စနစ္ထည့္သြင္းထားခဲ့ၿပီး အခုဆုိ ေနာက္ထပ္ ဘာသာစကား ၁၀ ခုကို ထပ္တုိးလာခဲ့ရာ ျမန္မာဘာသာက တခုပါ၀င္လာလို႔ ျမန္မာဘာသာသို႔ ဘာသာျပန္ လုိတာ၊ ဒါမွမဟုတ္ ျမန္မာဘာသာက ဂူဂဲလ္မွာရွိတဲ့ အျခားဘာသာကို ဘာသာျပန္လိုတာေတြ အတြက္ ေယဘူယ် အားျဖင့္ အဆင္ေျပသြားၿပီလို႔ ဆုိရပါမယ္။
အခုထပ္တိုးလုိက္တဲ့ ဘာသာစကား ၁၀ ခုကေတာ့ မာလာ၀ီနဲ႔ အနီးပတ္၀န္းက်င္က လူေပါင္း ၁၂ သန္း
ေလာက္ အသံုးျပဳတဲ့ Chichewa ဘာသာ၊ မာဒါကာစကာက လူ ေပါင္း ၁၈ သန္းေလာက္ အသံုးျပဳေနတဲ့ Malagasv ဘာသာ၊ ေတာင္အာဖရိကရွိ ဘာသာစကား ၁၁ ခုထဲက Lesotho က Sesotho ဘာသာ၊ အိႏၵိယတုိက္ရဲ႕ အဓိက ဘာသာစကား တခုျဖစ္ၿပီး လူေပါင္း ၃၈ သန္းေလာက္ အသံုးျပဳေနတဲ့ Malayalam ဘာသာ၊ လူေပါင္း ၃၃ သန္းေက်ာ္ အသံုးျပဳ ေနတဲ့ ျမန္မာ ( Myanmar)၊ သီရိလကၤာက လူေပါင္း ၁၆ သန္း ေလာက္ အသံုးျပဳေနတဲ့ Sinhala ၊ အင္ဒုိနီးရွား၊ ဂ်ာဗား ဘက္က လူေပါင္း ၃၉ သန္းေက်ာ္ အသံုးျပဳေနတဲ့ Sundanese ဘာသာ၊ ကာဇစ္စတန္က လူေပါင္း ၁၁ သန္း အသံုးျပဳ ေနတဲ့ Kazakh၊ တာဂ်စ္ကစၥတန္က လူ ၄ သန္း ေလာက္အသံုးျပဳေနတဲ့ Tajik ၊ ဥဇဘက္ကစၥတန္က လူေပါင္း ၂၅ သန္း
ေလာက္ အသံုးျပဳေနတဲ့ Uzbek ဘာသာဆုိတဲ့ ဘာသာစကား ၁၀ ခုကို ဂူဂဲလ္က ဘာသာျပန္၀န္ေဆာင္မႈ အသစ္အျဖစ္ ထပ္တုိးလိုက္တာပါ။
အခုလုိ ျမန္မာဘာသာကုိ ဂူဂဲလ္မွာ တရား၀င္ ဘာသာျပန္လုိ႔ ရလာတာဟာ ထူးျခားတဲ့ ေျခလွမ္း တရပ္ လည္းျဖစ္သလုိ မႏွစ္တုန္းကလည္း ဂူဂဲလ္တာ၀န္ရွိသူေတြ ျမန္မာႏုိင္ငံကို လာေရာက္ေဆြးေႏြးေျပာဆုိခဲ့ မႈေတြရဲ႕ေနာက္ဆက္တြဲ အက်ိဳးရလာဒ္ျဖစ္မယ္ထင္ပါတယ္။
အရင္ကထက္စာရင္ေတာ့ ဂူဂဲလ္မွာ ျမန္မာဘာသာစကားကုိ ယူနီကုဒ္နဲ႔ ပါ၀င္လာတာမို႔ အျခားဘာသာ စကားေတြနဲ႔ ဖလွယ္ရာမွာ အတိအက် မဟုတ္ေပမယ့္ အေတာ္ပဲ အဆင္ေျပသြားမယ္ထင္ပါတယ္။
ဘာသာစကားဟာ အခ်င္းခ်င္း ဆက္သြယ္ေျပာဆုိရာမွာ အတားအဆီးမျဖစ္ေစဖုိ႔ အခုလို ဂူဂဲလ္ ဘာသာ
ျပန္ အင္ဂ်င္နီယာ အဖြဲ႔က တီထြင္ေပးလုိက္ျခင္းလည္း ျဖစ္ပါတယ္။
ဂူဂဲလ္ရဲ႕ ဘာသာျပန္ လိပ္စာကေတာ့ https://translate.google.com/ ျဖစ္ၿပီး အခုဆုိ ျမန္မာဘာသာ အပါအဝင္ ဘာသာစကားေပါင္း ၁ဝဝ ကို ဘာသာျပန္ ဝန္ေဆာင္မႈ လုပ္ေဆာင္ထားတာေတြ႔ရပါလိမ့္မယ္။
♫တယ္လီဖုန္းေျခရာခံျခင္းႏွင့္သိထားသင့္ေသာသတိျပဳစရာမ်ား♫

တယ္လီဖုန္းေျဖရာခံျခင္းနဲ ့ပတ္သတ္ျပီး ဘယ္လိုဘယ္ပံုမ်ိဳးနဲ ့ ေျခရာခံတယ္ ၊ ဘယ္လိုဘယ္ပံု
မ်ိဳးနဲ ့ ကိုယ့္ကိုယ္ေျခရာခံတာကို ကာကြယ္မလဲဆိုတာကို ေျပာျပေပးပါမယ္၊
* သင္ဘယ္မွာရိွေနတယ္ဆိုတာကို ဘယ္လိုေျခရာခံတာလဲ ?
ဒါကေတာ့ရိုးရွင္းပါတယ္ သင္အသံုးျပဳေနတဲ့ ဖုန္းနဲ ့အနီးဆံုး တယ္လီဖုန္းေရဒီယို တာ၀ါတိုင္
သံုးခုကိုအသံုးျပဳျပီး ၾတိဂံ ပံုစံ ကြန္ယက္အတြင္းက တည္ေနရာကို တြက္ခ်က္တာပါ၊
ၾတိဂံေျခရာခံနည္းစနစ္ လို ့ေခၚပါတယ္၊ လူေနထူထပ္တဲ့ ျမိဳ ့ျပ လိုေနရာမ်ိဳး
(ဥပမာကၽြန္ေတာ္တို ့ရန္ကုန္ေပါ့ ) မွာ ေျခရာခံမယ္ဆိုရင္ တယ္လီဖုန္းတာ၀ါတိုင္ေတြ အမ်ားၾကီး
ရိွတဲ့အတြက္ 10 ေပ 15 ေပ အတြင္းအတိအက်သိ ႏိုင္ေပမယ့္ ဖုန္းတာ၀ါတိုင္ေတြနည္းပါးတဲ့
ေက်းလက္ေဒသလိုေနရာမ်ိဳးမွာေပါ့ ေပ ရာဂဏန္းအထိ ကြဲလြဲႏိုင္ပါတယ္၊
သင္ဖုန္းလက္ခံစကားေျပာတာ ၊message ပို ့တဲ့အခ်ိန္မ်ိဳးမွာ သင္ဘယ္ေနရာမွာရိွေနတယ္ဆိုတာကို
ကြန္ယက္မွတ္တမ္းေတြထဲမွာ သိမ္းဆည္းထားႏိုင္ပါတယ္၊ သတိျပဳရမွာက ဒါဟာ ဖုန္းကြန္ယက္ရဲ့
လုပ္ေဆာင္ခ်က္ပဲရိွပါေသးတယ္ ၊ဆိုလိုခ်င္တာကေတာ့ ဒါဟာေသေသခ်ာခ်ာေစာင့္ၾကည့္ေျခရာခံတဲ့ နည္းလမ္းေတြ မဟုတ္ေသးပါဘူး။ ကြန္ယက္တုိင္းက သင့္ဖုန္းက အသံလိႈင္းကုိ ႀတိဂံနည္းစံနစ္သံုးၿပီး ေျခရာခံႏုိင္ပါတယ္။ အဲဒီအတြက္ ဒီလုိအခ်က္အလက္ကုိသံုးၿပီး (ဘယ္မွာရွိေနတယ္ဆုိတာသိၿပီး) သင့္ကုိဒုကၡေပးႏုိင္တယ္ ဆုိတာ မေမ့ဖုိ႔ အင္မတန္အေရးႀကီးပါတယ္။
သင့္လက္ကုိင္ဖုန္းက ခ်ိတ္ဆက္မိတဲ့ ဖုန္းတာ၀ါတုိင္တုိင္းကုိ သင္ဘယ္မွာရွိေနတယ္ဆုိတာ စဥ္ဆက္
မျပတ္ သတင္းပုိ႔ပါတယ္။ ေျခရာမခံမိေစခ်င္ရင္ ဖုန္းထဲကဓါတ္ခဲကုိထုတ္ရံုသာမက ဖုန္းကုိပါအိမ္မွာ
ထားခဲ့ပါ။
ေျခရာခံျခင္းနဲ႔ပတ္သက္ၿပီး သတိျပဳသင့္တဲ့ အခ်က္တခ်ိဳ႕
သင္ပံုမွန္အသံုးျပဳသည့္ ဖုန္းဆင္မ္ကဒ္ (subscriber identity module လုိ႔ေခၚတဲ့ ဖုန္းကဒ္) အစား
ေျပာင္းလဲအသံုးျပဳႏုိင္မယ့္ (ဖုန္းကုမၸဏီမတူတဲ့) ဆင္မ္ကဒ္တခု ေဆာင္ထားပါ။ ျဖစ္ႏုိင္ရင္ေတာ့
ဖုန္းတလံုးထက္မက သယ္ေဆာင္အသံုးျပဳပါ။ အစည္းအေ၀းေတြအတြက္ ခရီးသြားေနစဥ္အတြင္း
ဖုန္းကတဆင့္ ေျခရာမခံႏုိင္ေအာင္၊ ဘယ္ေနရာေရာက္ေနတယ္ဆုိတာ မသိရေအာင္ ဖုန္းထဲက ဓါတ္ခဲ
ကုိ ထုတ္ထားပါ။ (ဖုန္းပုိင္ရွင္ ဘယ္ေနရာမွာရွိတယ္ဆုိတာ GPS စံနစ္လုိ႔ေခၚတဲ့ ၿဂိဳလ္တု
ကတဆင့္ ေျခရာခံႏုိင္သလုိ triangulation လုိ႔ေခၚတဲ့ ဖုန္းတုိင္ေတြကတဆင့္
ႀတိဂံေျခရာခံနည္းစံနစ္နဲ႔လဲေျခရာခံႏုိင္ပါတယ္)
အာဏာပုိင္ေတြက သင့္ကုိေျခရာခံေနတယ္လုိ႔ထင္ရင္
စိတ္ပူရင္ သင္အသံုးျပဳေနတဲ့ ဖုန္းကဒ္ ကုိသာမက ဖုန္းကုိပါ
စြန္ပစ္ပါ။
သင့္ဖုန္းက သင့္ကုိျပန္ေစာင့္ၾကည့္ နားေထာင္ႏုိင္ပါတယ္
သင္ဖုန္းသံုးမေနတဲ့ အခ်ိန္မွာေတာင္ တျခားသူေတြက လက္ကုိင္ဖုန္းေတြကုိ အသံဖမ္းစက္အျဖစ္
အသံုးျပဳၿပီး သင္ဖုန္းနဲ႔ဘာေတြေျပာတယ္ဆုိတာကုိ နားေထာင္ႏုိင္ပါတယ္။ ဥပမာအားျဖင့္ သင္
သူငယ္ခ်င္းေတြနဲ႔ ေတြ႔ဆုံေနတယ္ သင္တုိ႔ဖုန္းေတြက ေရွ႕ကစားပဲြေပၚမွာရွိေနတယ္ဆုိရင္
သင္နဲ႔ သူငယ္ခ်င္းေတြ ဘာေတြေျပာတယ္ဆုိတာကုိ အသံဖမ္းမွတ္တမ္းတင္ဖုိ႔အတြက္
အဲဒီဖုန္းေတြကုိ သံုးႏုိင္ပါတယ္။ ဖုန္းပိတ္ထားရံုနဲ႔မလံုေလာက္ တဲ့အတြက္ အဲဒီလုိေစာင့္ၾကည့္
နားေထာင္အသံဖမ္း မွတ္တမ္းတင္တာကုိ ကာကြယ္ဖုိ႔ တခုတည္းေသာနည္းလမ္းက ဖုန္းထဲက
ဓါတ္ခဲကုိထုတ္ထားဖုိ႔ပဲ ျဖစ္ပါတယ္။ သင့္လက္ကုိင္ဖုန္းနဲ႔ ဖုန္းကဒ္က သင္ဘယ္သူလဲဆုိတာေဖာ္ထုတ္ႏုိင္ပါတယ္
သင္ဘယ္သူလဲဆုိတာ ဖုန္းကေနတဆင့္ေဖာ္ထုတ္သိရွိတာကုိကာကြယ္ခ်င္ရင္
ဖုန္းကဒ္ေျပာင္းရံုနဲ႔ မလံုေလာက္ပါဘူး။ ဖုန္းတုိင္းမွာထူးျခားတဲ့နံပါတ္ေတြရွိပါတယ္။ အဲဒီအတြက္
လံုၿခံဳစိတ္ခ်ခ်င္ရင္ ဖုန္းကဒ္ေျပာင္းသံုးရံုတင္မဟုတ္ပဲဖုန္းကုိပါ ေျပာင္းသံုးရမွာျဖစ္ပါတယ္။
သင့္လက္ကုိင္ဖုန္းနဲ႔ ဖုန္းကဒ္က သင္ဘယ္သူလဲဆုိတာေဖာ္ထုတ္ႏုိင္ပါတယ္။ဖုန္းလက္ခံစကားေျပာတာပဲျဖစ္ျဖစ္၊
ကုိယ္ကဖုန္းေခၚတာပဲျဖစ္ျဖစ္၊ မက္ေဆ့ခ်္ပုိ႔တာပဲျဖစ္ျဖစ္၊အင္တာနက္ သံုးတာပဲျဖစ္ျဖစ္ ဒါမွမဟုတ္
ဘာမွသံုးမေနပဲအင္တာနက္နဲ႔ခ်ိတ္မိေနတာပဲျဖစ္ျဖစ္ ဖုန္းကြန္ယက္နဲ႔
ခ်ိတ္ဆက္ထားတယ္ဆုိရင္ ဖုန္းကဒ္အျပင္
ဖုန္းန႔ဲပတ္သက္တာေတြ စံုစမ္းသိရွိႏုိင္ပါတယ္။
ဖုန္းကဒ္ကေန သင္ဘယ္သူလဲဆုိတာ ဘယ္လုိမ်ိဳးေဖာ္ထုတ္ႏုိင္တာလဲ
ဖုန္းဆင္မ္ကဒ္ (subscriber identity module လုိ႔ေခၚတဲ့ ဖုန္းကဒ္) ထဲမွာ ဖုန္းကဒ္ပုိင္ရွင္ (သင္) နဲ႔
ပါတ္သက္တဲ့ အခ်က္အလက္ေတြ သိမ္းဆည္းထားပါတယ္။ အဲဒီအခ်က္အလက္ေတြက (ဖုန္းကဒ္
၀ယ္ခ်ိန္မွာ သင္ေပးထားတဲ့ အခ်က္အလက္ေတြျဖစ္ၿပီး) သင့္ ဖုန္းကုမၸဏီက သင္ဘယ္သူလဲ
ဆုိတာကုိခဲြျခားအသံုးျပဳရာမွာ သံုးပါတယ္။
လက္ကုိင္ဖုန္းကေန သင္ဘယ္သူလဲဆုိတာ ဘယ္လုိမ်ိဳးေဖာ္ထုတ္ႏုိင္တာလဲ
ဖုန္းကဒ္ကေနတဆင့္ သင္ဘယ္သူလဲဆုိတာကုိေဖာ္ထုတ္ႏုိင္တဲ့အျပင္ လက္ကုိင္ဖုန္းကလဲ သင့္ကုိ
ဒုကၡေရာက္ေစႏုိင္ပါတယ္။ လက္ကုိင္ဖုန္းတုိင္းမွာ (theInternational Mobile EquipmentIdentity-IMEI
လုိ႔ေခၚတဲ့ ႏုိင္ငံတကာ လက္ကုိင္ဖုန္း ခဲြျခားသိရွိေရးွဆုိင္ရာ)
ထူးျခားတဲ့နံပါတ္ေတြရွိပါတယ္။ အဲဒီ နံပါတ္ကတဆင့္
သင့္ကုိအခ်ိန္မေရြး ေျခရာခံလုိ႔ရပါတယ္။♫ ကြန္ျပဴ တာ အယူအဆအမွားေတြ♫

ကြန္ျပဴ တာ နဲ႔ ပတ္သက္ၿပီး နည္းလမ္းမ်ားစြာ ရွိပါတယ္။ အဲဒီအယူအဆ ေတြထဲက အခ်ိဳ႕
ဟာ မွားယြင္းေနပါတယ္။ အဲဒီအမွားေတြ ကို ေရွာင္ရွားႏုိင္တဲ့ နည္းလမ္းေတြကို ေရးေပးလိုက္ပါတယ္။
Default Installation ကို အသံုးျပဳျခင္း
--------------------------------------
Freeware ေတြဟာ အခမဲ့အသံုးျပဳႏုိ္င္တဲ့အတြက္ အလြန္အသံုး၀င္ပါတယ္။ ဒါေပမယ့္ Freeware အမ်ားစု မွာ
ေၾကာ္ညာေတြ ပါရွိၾကၿပီး Ad-Ware လို႔ ေခၚတဲ့ ေဆာ့၀ဲ အပိုေတြကို ထည့္သြင္းေပးတတ္ၾကပါတယ္။ အဲဒီ အပို
ေဆာ့၀ဲ ေတြ ဟာ ကြန္ျပဴ တာ ကို ေလးလံေစပါတယ္။ အဲဒီအတြက္ Freeware တစ္ခုကို အင္စေတာ လုပ္ၿပီဆိုတိုင္း
Custom Installation ကို အသံုးျပဳသင့္ပါတယ္။ Custom Installation ကို အသံုးျပဳရင္ Ad-Ware, Crapware ,
Browser Toolbar နဲ႔ အျခား ေဆာ့၀ဲ ေတြကို အင္စေတာ လုပ္ျခင္း မွ ေရွာင္ရွားႏုိင္မွာ ျဖစ္ပါတယ္။
Registry ရွင္းလင္းျခင္း
------------------------
Registry ရွင္းလင္းျခင္း ဟာ ကြန္ျပဴ တာ ကို ျမန္ဆန္ေစတယ္လို႔ ယူဆေနၾကပါတယ္။ အဲဒီ အယူအဆ ဟာ မွားယြင္း
ပါတယ္။ Windows Registry ဟာ Windows နဲ႔ Applications ေတြရဲ႕ Settings ေတြကို သိမ္းမွတ္ထားတဲ့ Database
ျဖစ္ပါတယ္။ Windows Registry မွာ Entry ေပါင္း သိန္းဂဏန္း ရွိပါတယ္။ ေဆာ့၀ဲ တစ္ခ်ိဳ႕ကို Uninstall လုပ္လိုက္တဲ့
အခါမွာ Registry မွာ Entry အနည္းငယ္ က်န္ရွိတတ္ပါတယ္။ အဲဒီ Entry အနည္းငယ္ ကို ရွင္းလင္းျခင္းဟာ ကြန္ျပဴတာ
ကို သိသာစြာ လွ်င္ျမန္လာေစမွာ မဟုတ္ပါဘူး။ အျခား Registry Entry ေတြကို မွားယြင္း ရွင္းလင္း မိတတ္ၿပီး မလိုလား
အပ္တဲ့ Error ေတြ ျဖစ္တတ္ပါတယ္။ ေဆာ့၀ဲ Company ေတြက သူတို႔ရဲ႕ Registry Cleaner ေတြ ေရာင္းေကာင္းေအာင္
လိမ္လည္ေၾကာ္ညာေနၾကတာျဖစ္ပါတယ္။
Disk Defragmentation မၾကာခဏ ျပဳလုပ္ျခင္း
------------------------------------------------
Windows က Drive ေတြကို ေနာက္ကြယ္မွာ အလိုအေလွ်ာက္ Defragment ျပဳလုပ္ေပးတဲ့အတြက္ ကိုယ္တိုင္ Defragment
ျပဳလုပ္စရာမလိုပါဘူး။ Fragmented ျဖစ္တဲ့ ႏႈန္းဟာ ၅ ရာခိုင္ႏႈန္းကေန ၁၀ ရာခိုင္ႏႈန္း အတြင္းမွာ ရွိလာမွသာ ကိုယ္တိုင္
Defragment ျပဳလုပ္သင့္ပါတယ္။ Magnetic Hard Drive (HDD) မ်ားမွာသာ Defragment ျပဳလုပ္စရာလိုပါတယ္။ Solid
State Drive (SSD) မ်ားမွာ Defragment ျပဳလုပ္စရာမလိုပါဘူး။
ကြန္ျပဴ တာ ကို Restart မျပဳလုပ္ျခင္း
-------------------------------------
ကြန္ျပဴ တာမွာ ျပႆသာနာခုတက္ရင္ ပထမဆံုး Restart ျပဳလုပ္ၿပီး ျပႆနာ ေျပလည္သြားၿပီလားဆိုတာ စစ္ေဆးသင့္ပါ
တယ္။ Reboot ျပဳလုပ္ျခင္းျဖင့္ ျပႆနာမ်ားစြာ ကို ေျပလည္ေစပါတယ္။ Reboot ျပဳလုပ္ျခင္းျဖင့္ ကြန္ျပဴတာ ေႏွးေကြးစြာ
အလုပ္လုပ္ျခင္း၊ Program ေတြက Memory ကို အလြန္အကြ်ံအသံုးျပဳျခင္း ၊ အင္တာနက္ နဲ႔ WiFi ခ်ိတ္ဆက္မရျခင္း ၊
Windows Blue Screen of Death ျပႆနာျဖစ္ျခင္း စတာေတြကို ေျဖရွင္းေပးႏုိင္ပါတယ္။
Data မ်ားကို Back Up မျပဳလုပ္ျခင္း
-----------------------------------
ေဒတာ ဆံုးရႈံးမႈျဖစ္ေစတဲ့ အေၾကာင္းအရင္းမ်ားစြာ ရွိပါတယ္။ အျဖစ္အမ်ားဆံုး က မွားယြင္းဖ်က္မိျခင္း၊ Hard Disk ပ်က္ဆီးျခင္း၊
Viruses နဲ႔ သင့္ေတာ္စြာ Shutdown မျပဳလုပ္ျခင္း တို႔ ျဖစ္ပါတယ္။ အဲဒီအတြက္ အေရးႀကီးတဲ့ ဖိုင္ေတြကို အျမဲတစ္ေစ Back
Up ျပဳလုပ္ထားသင့္ပါတယ္။ ေဒတာေတြကို Back Up ျပဳလုပ္ႏုိ္င္တဲ့ နည္းလမ္းမ်ားစြာ ရွိပါတယ္။ External Hard Drive မွာ Back
Up ျပဳလုပ္ျခင္း၊ Cloud Storage မွာ Back Up ျပဳလုပ္ျခင္း ၊ Network Drive အသံုးျပဳျခင္း တို႔ ျဖစ္ပါတယ္။ Windows 7 မွာ ေဒ
တာေတြကို Back Up , Restore ျပဳလုပ္ႏုိ္င္တဲ့ စြမ္းေဆာင္ခ်က္ပါရွိပါတယ္။ Windows 8 မွာ Time Machine Back Up စြမ္းေဆာင္
ခ်က္ပါရွိပါတယ္။
Windows OS နဲ႔ အျခား ေဆာ့၀ဲေတြကို Update မျပဳလုပ္ျခင္း
--------------------------------------------------------------
Developer ေတြက Updates ေတြျပဳလုပ္ေပးရတဲ့ အေၾကာင္းအရင္းမ်ားစြာ ရွိပါတယ္။ အဓိက အေၾကာင္းအခ်က္ေတြက စြမ္း
ေဆာင္ခ်က္ အသစ္ေတြကို ထည့္သြင္းေပးဖို႔၊ အမွားေတြကို ျပင္ဆင္ဖို႔၊ လံုျခံဳေရး ဟာကြက္ေတြကို ဖာေထးေပးဖို႔ နဲ႔ System ကို
ပိုမိုလံုျခံဳေစဖို႔ ျဖစ္ပါတယ္။
Control Panel>System and Security> Windows Update မွာ Windows Update ေတြကို ရယူႏုိင္ပါတယ္။ Windows
Update ေတြကို အလိုအေလွ်ာက္ Download ရယူၿပီး အင္စေတာ လုပ္ဖို႔ ကို Windows Update ရဲ႕ Settings ထဲမွာ သတ္မွတ္
ထားႏုိင္ပါတယ္။
Antivirus ကိုလည္း အျမဲတစ္ေစ Update ျပဳလုပ္ေပးဖို႔ လိုအပ္ပါတယ္။ Antivirus Company ေတြက Virus အသစ္ေတြကို
ကာကြယ္ဖို႔ Virus Database ေတြကို ေန႔စဥ္ Update ျပဳလုပ္ေပးေလ့ရွိပါတယ္။
ကြန္ျပဴတာနည္းပညာနယ္ပယ္ ဟာ က်ယ္ျပန္႔တဲ့အတြက္ မွားယြင္းတဲ့ အယူအဆေတြကို လက္ခံက်င့္သံုးေနသူေတြ အမ်ားႀကီး
ရွိပါတယ္။ အေပၚမွာ ေဖာ္ျပထားတဲ့ အယူအဆမွားေတြကို သိရွိၿပီး ေရွာင္ရွားႏုိင္ဖို႔ ေရးသားေပးလိုက္ပါတယ္။
♫Windows 10 Gamer Edition 2015 x86 x64 Plus Activation♫

Windows 10 Gamer Edition 2015 ေလးပါ လိုင္းမေကာင္းေသာေၾကာင့္မူရင့္လင့္ကေနဘဲေဒါင္းၾကပါ
Code Name : 10 Gamer Edition
OS Name : Windows 10 TP
Architecture : 32bit-64-bit
Language : English ( Download And Install other language after installation)
Version : 9860
Service Pack : 1
Applications : 10 New Apps included
Tested : Tested on Intel DC,C2D,i3,i5,i7,AMD CQ
OS Size : 1.6GB
Software Size : 400MB
ISO Size : 2GB
OS Name : Windows 10 TP
Architecture : 32bit-64-bit
Language : English ( Download And Install other language after installation)
Version : 9860
Service Pack : 1
Applications : 10 New Apps included
Tested : Tested on Intel DC,C2D,i3,i5,i7,AMD CQ
OS Size : 1.6GB
Software Size : 400MB
ISO Size : 2GB


- Processor: 1 gigahertz (GHz) or faster
- RAM: 1 gigabyte (GB) (32-bit) or 2 GB (64-bit)
- Free hard disk space: 16 GB
- Graphics card: Microsoft DirectX 9 graphics device with WDDM driver
Software Added :
– 360 Total Security
– Adobe Reader
– Adobe Flash Player
– Adobe ActiveX
– CCleaner Professional
– Format Factory
– Internet Download Manager
– Java Runtime Environment 8.25
– Notepad++ 6.9
– Microsoft Silverlight x64
– Malware Bytes
– Skype
– Ultra ISO 9.8.1
– USB Disk Security 6.2.0.432
– VLC Media Player 2.1.5
– Visual C++ 2005 x86
– Visual C++ 2005 x64
– Visual C++ 2008 x86 9.0.30729.7523
– Visual C++ 2008 x64 9.0.30729.7523
– Visual C++ 2010 x86 10.0.40219.455
– Visual C++ 2010 x64 10.0.40219.455
– Visual C++ 2012 x86 11.0.60830.0
– Visual C++ 2012 x64 11.0.60830.0
– Visual C++ 2013 x86 12.0.21005.1
– Visual C++ 2013 x64 12.0.21005.1
– Microsoft Visual F Runtime 2.0
– Winrar 5.0
What’s Removed– 360 Total Security
– Adobe Reader
– Adobe Flash Player
– Adobe ActiveX
– CCleaner Professional
– Format Factory
– Internet Download Manager
– Java Runtime Environment 8.25
– Notepad++ 6.9
– Microsoft Silverlight x64
– Malware Bytes
– Skype
– Ultra ISO 9.8.1
– USB Disk Security 6.2.0.432
– VLC Media Player 2.1.5
– Visual C++ 2005 x86
– Visual C++ 2005 x64
– Visual C++ 2008 x86 9.0.30729.7523
– Visual C++ 2008 x64 9.0.30729.7523
– Visual C++ 2010 x86 10.0.40219.455
– Visual C++ 2010 x64 10.0.40219.455
– Visual C++ 2012 x86 11.0.60830.0
– Visual C++ 2012 x64 11.0.60830.0
– Visual C++ 2013 x86 12.0.21005.1
– Visual C++ 2013 x64 12.0.21005.1
– Microsoft Visual F Runtime 2.0
– Winrar 5.0
-Drivers for modems(Except base and Nokia)
-Printers (except HP, GE, OLED, MS)
-Windows Defender
-Natural Speech
-Handwriting
-HomeGroup
-Terminals
-Telnet
-Group Policy
-HyperV
-Virtualization
-Winsxs
-PowerShell
-Onscreen keyboard
-Indexing
-Parental Control
-Network Printing
Whats’ New??
– New Eye catching themes
– New icon sets
– New Sound schemes
– New Registry settings
– Hang time ratio improved
– Added best shortcut styles
– Improved application interface
– Added RUN on start menu
– Add change theme
– Add change wallpaper
– Add desktop icon settings
– Advanced user accounting
– Clear type view
– Disable Tool Tips
– Disable Hibernate
– Don’t mark new applications
– On Right Click Freeware Sys
– Enable Clear Type Tuning
– Enable DVD in media player
– Enable Glass Effect(WDM) without graphics card
– Enable MP3 Encoding on right click
– Enable slow motion windows effects
– Enable status bar in notepad
– Get rid of windows mail splash
– Give your self permission to modify all
– Grant full admin control
– DiLshad Sys Site direct link from right click
– Removed Action center Icon
– Windows speed tweaking
– Wait to kill service – 2000
– Low level hooks time out – 1000
– Hang application time out – 1000
– Menu show delay – 0
– No low disk space warning
– Process Schedule 1st Program
– Mouse Speed Increased
– Hang Ratio Decreased
– Fast Shut Down And Login
– Down Power After Shut Down
– Touch Screen Feature Added
– Grant Admin control on Right Click
– Add Admin Tools on Desktop Context Menu
– Add manage on Desktop Context Menu
– Add Move to Folder on Desktop Context Menu
– Add Copy To Folder on Desktop Context Menu
– Add Task Manager on Desktop Context Menu
– Add Take Ownship on Desktop Context Menu
– Add Register and Unregister to .dll OCX Context Menu
– 500ms Delay Aero
– Larger Taskbar Previews
– small Taskbar Icon
– Detailed Shut Down And Login
– Blocked Negative DNS Entery
– turn Off System Beep
– Turn off low Disk
Link Download
Single Link
Turbobit
180Upload
390 Mb Links
SolidFiles
MirrorCreator
♫iPhone 6 Plus သံုးစြဲသူမ်ား သိထားသင့္သည့္ အခ်က္ (၂၀) ♫

iPhone 6 Plus တြင္ iOS 8 ကို အသံုးျပဳထားၿပီး ၎တြင္ပါဝင္သည့္ အခ်ဳိ႕ေသာ feature မ်ားကို OS X Yosemite အသံုးျပဳထားေသာ Mac ႏွင့္ iOS 8 အသံုးျပဳထားေသာ iPad တို႔မွ အက်ိဳးရိွရိွ အသံုးခ်ႏိုင္သည္။
ထို႔ေၾကာင့္ iPhone 6 Plus သံုးစြဲသူမ်ား သိထားသင့္သည့္ အခ်က္မ်ားကို ေဖာ္ျပလိုက္ပါသည္။
(၁) လက္တစ္ဖက္တည္းျဖင့္ အသံုးျပဳျခင္း
iPhone 6 Plus သည္ အရြယ္ႀကီးမားသည့္ ထုတ္ကုန္တစ္ခု ျဖစ္ေသာေၾကာင့္ လက္တစ္ဖက္တည္းျဖင့္ အသံုးျပဳရာတြင္ အခက္ႀကံဳႏိုင္သည္။ သို႔ေသာ္လည္း ၎တြင္ built-in ပါဝင္သည့္ tool တစ္ခုက iPhone 6 Plus ကို လက္တစ္ဖက္တည္းျဖင့္ အလြယ္တကူ အသံုးျပဳေစႏိုင္သည္။
Reachability ဟုေခၚသည့္ feature ကို အသံုးျပဳလိုသည့္အခါ home ခလုတ္ကို ႏွစ္ခ်က္ပုတ္႐ံုျဖင့္ အသံုးျပဳႏိုင္သည္။ Home ခလုတ္ကို ႏွစ္ခ်က္ tap လုပ္လိုက္သည့္အခါ iPhone 6 Plus screen က လက္တစ္ဖက္တည္းျဖင့္ အသံုးျပဳ၍ ရႏိုင္သည့္ အကြာအေဝးသို႔ က်လာမည္ ျဖစ္သည္။

(၂) Slow Motion ဗီဒီယို ႐ိုက္ကူးျခင္း
iPhone 6 Plus တြင္ slow motion ဗီဒီယိုကို 240fps ျဖင့္ ႐ိုက္ကူးႏိုင္သည္။ ၎သည္ ဗီဒီယိုမ်ားကို အလြန္ေႏွးေကြးေသာ အျမန္ႏႈန္းျဖင့္ ႐ိုက္ကူးႏိုင္သည္။ ထိုသို႔ ႐ိုက္ကူးရန္အတြက္ Camera app ကို ဖြင့္ၿပီး slow-motion mode ကို ေျပာင္းကာ ညာဘက္အေပၚေထာင့္တြင္ 240fps ကို ေျပာင္းထားရန္လိုအပ္သည္။
(၃) Landscape mode ျဖင့္ အသံုးျပဳျခင္း
iPhone 6 Plus တြင္ landscape keyboard သစ္၊ app အတြက္ layout သစ္မ်ားႏွင့္ home screen အတြက္ landscape အပါအဝင္ landscape mode ကို ေထာက္ပံ့ေပးထားသည္။ ၎သည္ iPhond 6 Plus ကို iPad တစ္လံုးကဲ့သို႔ အသံုးျပဳႏိုင္ေစသည္။ iPhone 6 Plus ကို အလ်ားလိုက္ အသံုးျပဳသည့္အခါ home screen တြင္ app မ်ားကို landscape view အေနျဖင့္ ေတြ႕ျမင္ရမည္ ျဖစ္သည္။ Mail, Notes, Calendar app မ်ားတြင္ landscape mode ျဖင့္ အသံုးျပဳသည့္အခါ screen ေပၚမွ အခ်က္အလက္ကို iPad ေပၚတြင္ အသံုးျပဳသကဲ့သို႔ ေတြ႕ျမင္ရမည္ ျဖစ္သည္။
(၄) လက္တစ္ဖက္တည္းျဖင့္ သံုးႏိုင္မည့္ Keyboard
အဆုိပါနည္းလမ္းကို အသံုးျပဳရန္အတြက္ iPhone 6 Plus တြင္ third-party keyboard တစ္မ်ိဳးကို ဝယ္ယူအသံုးျပဳရန္ လိုအပ္သည္။ App Store တြင္ $1.99 ျဖင့္ ဝယ္ယူႏိုင္မည့္ One Handed Keyboard သည္ iPhone 6 ႏွင့္ iPhone 6 Plus တြင္ စာ႐ိုက္ရာ၌ လက္တစ္ဖက္တည္းျဖင့္ ႐ိုက္ႏိုင္ေစမည္ ျဖစ္သည္။
(၅) Password မ်ားကို Touch ID ျဖင့္ ကာကြယ္ျခင္း
Touch ID သည္ iPhone 6 Plus ကို unlock ျပဳလုပ္ႏိုင္သလို iTunes မွ ဝယ္ယူမႈမ်ားကိုလည္း ျပဳလုပ္ႏုိင္သည္။ ထို႔အျပင္ Touch ID ကို အခ်ိဳ႕ေသာ ကိစၥရပ္မ်ားတြင္လည္း အသံုးျပဳႏိုင္သည္။ ဥပမာအေနျဖင့္ LastPass သို႔မဟုတ္ 1Password ကဲ့သို႔ေသာ app မ်ားကို အသံုးျပဳသည့္အခါ website မ်ားတြင္ log in ျပဳလုပ္သည့္ အခ်က္အလက္မ်ားကို ပိုမိုလံုၿခံဳမႈရိွေစရန္ Touch ID ျဖင့္ ကာကြယ္ထားႏိုင္သည္။
(၆) iPhone 6 Plus ဘက္ထရီသက္တမ္းကို ပိုမိုေကာင္းမြန္ေစရန္ ျပဳလုပ္ျခင္း
iPhone 6 Plus သံုးစြဲသူမ်ားသည္ ဘက္ထရီကို တစ္ရက္ခန္႔ အသံုးျပဳႏိုင္ေသာ္လည္း ျပႆနာ တစ္စံုတစ္ရာေၾကာင့္ ဘက္ထရီ လ်င္ျမန္စြာ ကုန္ဆံုးျခင္းမ်ိဳး ျဖစ္ေပၚႏိုင္သည္။ ထိုသို႔ ျဖစ္ေပၚသည့္အခါ Settings > General > Usage > Battery Usage သို႔သြားၿပီး ဘက္ထရီ အသံုးျပဳမႈ အမ်ားဆံုး app မ်ားကို ရွာေဖြႏိုင္သည္။ အကယ္၍ app တစ္ခုခုက ဘက္ထရီ သံုးစြဲမႈ အလြန္မ်ားေနပါက ၎ကို uninstall သို႔မဟုတ္ stop ျပဳလုပ္ႏိုင္သည္။ Facebook သည္ ဘက္ထရီသက္တမ္းကို အလ်င္အျမန္ ကုန္ဆံုးလြယ္ေစေသာ္လည္း ၎ကို uninstall ျပဳလုပ္ျခင္းကို မည္သူမွ် ျပဳလုပ္ၾကမည္ မဟုတ္ေပ။

(၇) ေျခလွမ္းႏွင့္ က်န္းမာေရးကို ေျခရာခံျခင္း
iPhone 6 Plus တြင္ သံုးစြဲသူ၏ တစ္ေန႔တာ ေျခလွမ္းအေရအတြက္ စသည့္ ကိစၥရပ္မ်ားကို accessory မ်ားႏွင့္ app မ်ား ထပ္မံဝယ္ယူရန္ မလိုဘဲ ျပဳလုပ္ႏိုင္သည္။ iPhone 6 Plus home screen ရိွ Health app ကို ဖြင့္ၿပီး Health Data, Fitness ကို tap လုပ္ကာ dashboard ေပၚတြင္ ေဖာ္ျပႏိုင္သည့္ option ကို ေရြးခ်ယ္ႏိုင္သည္။
(၈) Vibration Alert မ်ားကို ေျပာင္းလဲျခင္း
iPhone 6 Plus vibration အသံသည္ ၎၏ ringer ထက္ အသံပိုက်ယ္သည္။ ထို႔ေၾကာင့္ အစည္းအေဝးခန္းအတြင္းရိွ silent လုပ္ထားသည့္ iPhone 6 Plus တြင္ call သို႔မဟုတ္ text ဝင္ေရာက္လာသည့္အခါ အေႏွာင့္အယွက္ ျဖစ္ႏိုင္သည္။ Settings > Sounds > Tap on Ringtone > Vibration > Create New Vibration တြင္ tap လုပ္ကာ save လုပ္ၿပီး vibration ကို ဖန္တီးႏိုင္သည္။
(၉) iPhone 6 Plus ကို HDTV ႏွင့္ ခ်ိတ္ဆက္ျခင္း
iPhone 6 Plus screen ကို အရြယ္ႀကီးမားသည့္ screen ေပၚတြင္ ျပသလိုသည့္အခါ iPhone 6 Plus ကို Apple TV ႏွင့္ ခ်ိတ္ဆက္ၿပီး ဗီဒီယိုၾကည့္ျခင္း၊ ဂိမ္းကစားျခင္းတို႔ကို ျပဳလုပ္ႏိုင္သည္။ ထိုသို႔ ျပဳလုပ္ရန္အတြက္ ၉၉ ေဒၚလာတန္ Apple TV လိုအပ္သည္။ ထို႔ေနာက္တြင္ Control Center > AirPlay > Apple TV ျဖင့္ iPhone 6 Plus screen ကို HDTV ေပၚတြင္ ျပသႏိုင္သည္။
(၁၀) iPhone 6 Plus တြင္ app မ်ားကို အလြယ္တကူ သံုးႏိုင္ရန္ စီစဥ္ထားရိွျခင္း
iPhone 6 Plus ၏ ညာဘက္အေပၚေထာင့္ကို လက္တစ္ဖက္တည္းျဖင့္ အသံုးျပဳရန္ အဆင္မေျပသူမ်ားအေနျဖင့္ Reachability ကို အသံုးျပဳႏုိင္ေသာ္လည္း ၎ feature ကို အသံုးမျပဳလိုသူမ်ား အေနျဖင့္ လက္လွမ္းမီသည့္ ေနရာတြင္ app မ်ားကို စီစဥ္ထားရိွျခင္းျဖင့္ ျပဳလုပ္ႏိုင္သည္။ ပံုမွန္အသံုးျပဳသည့္ app မ်ားကို iPhone 6 Plus screen ၏ အလယ္ သို႔မဟုတ္ ေအာက္ေျခဘက္တြင္ ထားျခင္းျဖင့္ app မ်ားကို လက္တစ္တည္းျဖင့္ ဖြင့္ႏိုင္မည္ ျဖစ္သည္။
(၁၁) Mac တြင္ Instant Hotspot ျဖင့္ အသံုးျပဳျခင္း
iOS 8 အသံုးျပဳထားသည့္ iPhone တြင္ Instant Hotspot ကို ဖြင့္ထားသည့္အခါ Mac ျဖင့္ iPhone ကို ခ်ိတ္ဆက္ရာတြင္ မည္သည့္အရာကိုမွ ဖြင့္စရာမလိုဘဲ WiFi option ရိွ iPhone ကို ေရြးခ်ယ္႐ံုျဖင့္ Instant Hotspot ကို အသံုးျပဳႏုိင္သည္။

(၁၂) Mac တြင္ iPhone 6 Plus text မ်ား ဖတ္႐ႈျခင္း
iPhone 6 Plus ႏွင့္ iOS 8.1 တြင္ OS X Yosemite အသံုးျပဳထားသည့္ Mac မွ text message မ်ား ဖတ္ျခင္း၊ အေၾကာင္းျပန္ျခင္းတို႔ကို ျပဳလုပ္ႏိုင္ရန္ ေထာက္ပံ့ေပးထားသည္။ Mac ေပၚရိွ messages Settings တြင္ အဆိုပါ feature ကိုဖြင့္ၿပီး သံုးႏိုင္သည္။

iPhone 6 Plus ကို Mac သို႔မဟုတ္ iPad ႏွင့္ ခ်ိတ္ဆက္ကာ ဖုန္းေခၚဆိုမႈမ်ား ျပဳလုပ္ျခင္း၊ ေျဖၾကားျခင္းတို႔ကို ေဆာင္ရြက္ႏိုင္သည္။ ဖုန္းဝင္လာသည့္အခါ iPhone 6 Plus ႏွင့္ မေျပာလိုသူမ်ား အေနျဖင့္ Mac ေပၚမွတစ္ဆင့္ ဖုန္းေခၚဆိုမႈကို ေျဖၾကားႏိုင္သည္။

iPhone 6 Plus, Mac ႏွင့္ iPad ကို အသံုးျပဳသူမ်ားအတြက္ Handoff က အေကာင္းဆံုး feature တစ္ခု ျဖစ္သည္။ ၎သည္ Apple ထုတ္ကုန္မ်ားအၾကား အလ်င္အျမန္ ေျပာင္းလဲအသံုးျပဳႏိုင္သလို လိုအပ္သည့္ ဖိုင္မ်ားကိုလည္း အလ်င္အျမန္ ဖြင့္ႏိုင္သည္။
(၁၅) Apple Pay ျဖင့္ ေငြေပးေခ်ျခင္း
iPhone 6 Plus တြင္ NFC အတြက္ အေထာက္အပံ့ပါဝင္ေသာေၾကာင့္ Apple Pay မွတစ္ဆင့္ ေငြေပးေခ်မႈ ျပဳလုပ္ႏိုင္သည္။ အဆိုပါ မိုဘိုင္းေငြေပးေခ်မႈစနစ္သည္ လံုၿခံဳၿပီး credit card မ်ားကို အသံုးျပဳျခင္းထက္ ပိုမိုလြယ္ကူသည္။ သို႔ရာတြင္ Apple Pay ကို Store တိုင္းႏွင့္ ဘဏ္တိုင္းက လက္ခံျခင္း မရိွေသးေပ။
(၁၆) iPhone 6 Plus မွ ဓာတ္ပံုအားလံုးကို iCloud တြင္ အလိုအေလ်ာက္ သိမ္းဆည္းျခင္း
iPhone 6 Plus တြင္ ႐ုိက္ကူးထားသည့္ ဓာတ္ပံုမ်ားကို iCloud တြင္ သိမ္းဆည္းလိုသည့္အခါ iCloud Photo Library ကို ဖြင့္႐ံုျဖင့္ ျပဳလုပ္ႏိုင္သည္။

iPhone 6 Plus display သည္ အရြယ္ႀကီးမားေသာေၾကာင့္ desktop version ဝက္ဘ္ဆိုက္မ်ားကို ၾကည့္႐ႈႏိုင္သည္။ iPhone ေပၚတြင္ ဝက္ဘ္ဆိုက္မ်ားကို မိုဘိုင္းဗားရွင္းျဖင့္သာ ေဖာ္ျပေသာ္လည္း desktop version ကို ေရြးခ်ယ္ၿပီး အလြယ္တကူ ေျပာင္းလဲ ၾကည့္႐ႈႏိုင္သည္။
(၁၈) iPhone 6 Plus ကို Bluetooth Keyboard ျဖင့္ အသံုးျပဳျခင္း
iPhone 6 Plus ကို အရြယ္ေသးငယ္သည့္ ေဒၚလာ ၃၀ တန္ Bluetooth Keyboard ျဖင့္ ခ်ိတ္ဆက္ၿပီး အေသးစား laptop အေနျဖင့္ အက်ိဳးရိွရိွ အသံုးျပဳႏိုင္သည္။

iPhone 6 Plus တြင္ Tap အနည္းငယ္လုပ္႐ံုျဖင့္ ဖိုင္ သို႔မဟုတ္ link တစ္ခုကို iPhone မွ Mac ထံ ေဝမွ်ႏိုင္သည္။ ကြန္ပ်ဴတာမွ ဖိုင္ကို iPhone 6 Plus ထံ ေဝမွ်ရာတြင္လည္း အလြယ္တကူ ျပဳလုပ္ႏိုင္သည္။

(၂၀) Time Lapse ဗီဒီယို ႐ိုက္ကူးျခင္း
iPhone 6 Plus ႏွင့္ iOS 8 တြင္ Time Lapse option သစ္ ပါဝင္လာသည္။ Camera app ကိုဖြင့္ၿပီး Time Lapse ကို ေရြးကာ record ကို tap လုပ္ၿပီး ကင္မရာကို ၿမဲၿမံစြာ ကိုင္ထားျခင္းျဖင့္ Time Lapase ဗီဒီယို ႐ိုက္ကူးႏိုင္သည္၊၊
Subscribe to:
Posts
(
Atom
)